Search This Blog

Showing posts with label VW Engine. Show all posts

Thursday, 1 October 2020

Update Oct 1st 2020

A few final jobs before it goes back to the paint shop for a little remedial work to a few paint scratches caused build during build, I'm quite pleased that there isn't much.

From the paint shop it's up to the trimmers 1st week in November. So this is probably going to be my last update until I get the car back, hopefully in December (maybe)

Offside rear suspension

The offside rear was just not sitting at a good height, I had maxed out on the adjustment on the spring plates, but it still was not correct. I decided to bite the bullet and strip down the suspension arm, and reset back one spline on the outer torsion bar. Quite a job, but it's done and I now have a good ride height with the adjustment set the same on both sides of the car.

Other jobs

  • The front and rear sway bars have been tightened
  • Fitted the old VW steering wheel and got the horn working, this will be replaced with my custom wheel after the IVA test


  • Added Stickers relating to brake fluid


  • Finalised fit on the external oil filter and pipework.
  • Refitted final engine tinware
  • Completed a full engine run and final check on any leaks etc
Engine will need a final tune and setting up of tappets, but for now its running ok


Interior

The trimmer has provided a visual mockup of the interior, finding the colour carpet I wanted was not easy, then I found it when having a browse around John Lewis! These are just a start point, be interesting to see how it progresses once we start.

Handing over the car to someone else is scary!!! I've warned the trimmer that I am more than a little obsessed with detail,  but I'm not sure he gets how OCD I am!


Monday, 27 July 2020

Update July 27th 2020

Its been a busy July!! Lots done and the car is nearly ready for the trimmers. As you would expect not everything came together as expected and there has been a few reworking parts that were fitted earlier. 

Pinstriping detail

I have some pinstriping added to the engine tinware and around the from bonnet (hood) latch area.


I have fitted the filler pipe, always nasty drilling more holes in the body!. Didn't quite line up initially, but quickly sorted it. I'm not going to do a final fit on fuel tank until I have finished setting up the ride height and steering geometry, the access is so much better without the tank in place 
Not quite aligned!


Seat belt fix points

Photo from Westfield Cars
showing the required bracket
Photo from Westfield Cars
showing the drilled out panel

The IVA test requires a specific minimum height for the part of the seat belt mounted over your shoulder.  

Having looked at what Chesil have done in the past, and with some measurements and photographs from Westfield cars (thank you Patrick), I drilled out the mount points and will need to fabricate the bracket. 


Rear parcel shelf

On a normal Chesil, the rear "seat" is a simple trimmed cushion. In my car as I have mounted the oil cooler into the base I need to create a raised base that will protect the cooling fan and also hide the audio amplifier. I drew up a quick sketch then have set about making some templates, with the help of my local furniture builder we are crafting up a suitable frame and cover. Pictures next month will make this a lot clearer.
Mock up drawing


Current state

Fit Exhausts

I did a trial fit of the exhaust and figured out what tinware needed to be modified. I did the mods which also meant crafting a couple of new brackets then had some of the tinware re powder coated.
Fitted the exhaust, getting hold of the 42mm gaskets wasn't easy, or cheap.


I am having to modify the oil hoses in order to route around the exhaust, during the refit I'm going to be protecting them with a heat protection sleeve.


Insulation.

I completed the interior insulation with a layer of sound deadening then another layer of the foam sound proofing material

Starting to fit the sound deadening


Both layers in place

I have fitted the soundproofing carpet underlay


Doors

Final fit on glass, with never ending adjustment on the winding mechanisms! Also fitted the rubber outer glass seal and inner felt seal.

Prepare seat mounts

I worked out the position of the fixing points for the seats (donored from the an MX5 courtesy of my local scrapyard) that I will be using to get the car through the IVA test. It's definitely a case of measure three times, drill once. All four mount points are now done and painted to avoid any corrosion.The custom seats need some work to figure out the best way to mount in the car hopefully ending up at the correct height.


Time spent on build

I have been keeping a log of the build time, bear in mind this is my first build so a lot of head scratching going on, but thought I would share my time log todate. This does not include research time!!!!


Next Jobs

  • Fitting exterior trim (some of it)
  • Refitting the remade oil pipes and heat shield
  • Refitting remaining engine tinware
  • Fitting engine bay seal

References

Drawing for IVA seat belt mount, I take no responsibility!!!! 


Tuesday, 21 January 2020

Update Jan 21st 2020

Happy New Year!! I'm now back on the car after a nice long break over Christmas. There are a lot of smaller jobs to finish off before I get stuck into the electricals.

Body Fix (did this work in Dec 2019)

The body is fixed by a number of bolts down both sides of the car, as well as a number on the subframe. The side fixing points need to be drilled out from under the car and it was quite an awkward job, a four point lift would have made the job much easier.

Side mounts

Rear subframe


Rear cross frame


Oil Cooler & Oil filter

The pipework connecting  the oil cooler and oil filter to the engine was mocked up using cheap flexible pipe, using these as a template I had the final oil pipes manufactured from really nice and much more expensive material.


Once the tinware on the engine was in place, and it didn't originally fit, taking a few hours of filing and adjustment to get it all on, I did a dummy fit on the tray that sits below the engine. I needed to get this in place before I did a final fix in position of the oil cooler pipes and as expected it didn't fit and needed some "adjustment".

Final piece of tinware fitted and lower engine tray clamped in place prior to adjustment

Once "adjusted I did the final fit of the tray using a seal from a T25 Van rather than the seal supplied which being much smaller and more rigid didn't give the final seal that I wanted. All fits well,  but I have removed it to give me better access to the engine bay for fitting the fuel pipes and wiring.

Van seal on the left original seal on the right

The oil pipes and filter assemblies were fitted to the subframe by drilling out and fixing using Rivnut fitting,

Oil filter mounted onto rear subframe

Final Fix of the coil pack

I had to adjust the original bracket to lift the coil back away from the engine tray. Once modified I painted it black to match the coil pack.
Before adjustment


After adjustment


Wiring Loom

I have started to pull the wiring loom through the car.I going to have to add additional working on for a number of items, this list may grow, but for now its as below:
  • Heated seats
  • Music
  • Immobiliser
  • USB chargers
  • Electric heater


Monday, 25 November 2019

Update November 2019

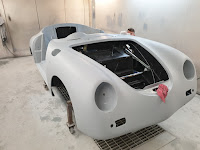
Painted shell

Option1 have worked on the car to bring the panel fit and shut lines up to scratch. 


Final warm silver colour applied, you need to see this in the flesh to appreciate the warm that is in the silver. Looks really good.


Body Shell refit

Body shell was lifted up and then the engine was fitted to the chassis. Once in place the body shell was very carefully lowered into place.

Engine

Specification highlights

  • Aluminium super race case, full flow oil and bored to 94mm
  • Engle 120 crank
  • EMPI GTV-2 cylinder heads with big valves
  • Pertronox Flamethrower ignition system
  • Twin 44 HMPX carbs

Colour choices

  • The tinware has been powder coated in grey/silver with metal fleck.
  • Subtle use of the purple colour
    • HT cable clips
    • Throttle swivel linkage
    • Oil filler cap
    • Gearbox cradle and strap
  • Carburettors stripped and painted black with the stacks (although hidden) coated purple

Fit

The engine has been fitted to the chassis, big milestone. No electrics or fuel connected yet. The exhaust will be custom made later in the project, fitted an old one for now


Engine Bay

I had the quilted aluminum work that is fitted in the engine bay painted to match the purple highlight colour that is being used across the whole car. The idea, was to have the light coloured tinware "pop". I think it looks good, but radical!

Also note the custom hinges, these are one off I had made.


I wanted a very clean look to the engine, part of this was to have no visible coil. The coil pack is now fitted away from the engine and invisible when looking into the engine bay from the back of the car.


Remote Oil Cooler

The engine has a full flow oil system and I needed to fit the cooler, fan and pipework, but where? There is very little space, the two options. 

Option 1, tucked under the rear wing, but it would have needed a very complex set of brackets and probably no place for the oil filter.

Option 2; Use the rear stowage area, this is fine for me as I have some ideas on what that area will look like in the finished car. I will need be to box in the fan, another job for later, but access was much easier and the pipework and oil filter will work out fine.